Sunday, 27 November 2016

Another Productive Week

I've had a rather good week, and feel that I am actually starting to get moving on my UFO List of Doom.

Here's what I have managed to get done in the last 7 days. Sorry the pics are not great - they were taken too early in the morning.

  • Finished the embroidery on my Sashiko table runner. All I need to do now is add the border and backing, and then lightly hand quilt it.


  • Finally found the fabric that I had put aside to make an apron for Bay Quilters... and finished sewing it the same day!

  • Continued working on another strippy quilt (this is my "take along to patchwork" project).


  • My Handmade/Lucky Sewalong quilt - I thought it looked a bit drab and uninspiring, so I split it into 2 pieces and added wide black and white borders making two good single bed sized quilts. I also worked some lazy daisies here and there with perle cotton to brighten up some of the paler prints. One is backed with polar fleece and pinned out ready to quilt. The other is still waiting to be pinned.


  • Started working on "Twisted" using 2 Rainbow jelly rolls from Spotlight. Just as well they were on special cos they are shite! I'll never buy them again. Anyway.... I pulled out some white from my stash for the background, and a dark blue batik for the contrast. All the pieces are cut out, and I've nearly finished marking the diagonal lines on 384 squares!


  • We're on holidays for a short break soon so I've chosen a UFO to take with me. It's a quilt as you go flannel hexagon lap quilt for my 92 year old Mum which I started a couple of years ago. I hope to have it finished for Christmas.


  • I had a good look at my BOMs and have chosen one to start work on in January for BOMs Away! - it's a gorgeous one called Garden Tea Party. Here's a pic. I don't know why I haven't started this one yet - it is just so pretty!

  • Worked on my Quilts Shops in W.A. page. I contacted all of them and asked if they'd like to send me some pics and info. I've had some replies and added their pics - lots more to come tho.

  • BOMs Away oh my goodness. When I set that up I was hoping that maybe 30 or 40 people might sign up. We're up to 194 so far!!!!

All in all, I reckon that's not too bad for just 1 week 😀

Saturday, 19 November 2016

BOMs Away!


Another reason that I am a guilty quilter is... block of the month programs. I love 'em! I love getting a parcel in the post each month. The only trouble is, I seldom actually finish the BOM. Sometimes I don't even start it. I just wants it!

I have found that having a check-in deadline in a group helps me to get things done, so I have created the "BOMs Away" Facebook group for Australian residents only (otherwise the group might get too big to manage).

The purpose of the group is for us to encourage each other, show us your progress, and to get that BOM done!

If you have a BOM waiting to be started, almost finished, or only just begun, and you need motivation to get it done, then please join BOMs Away. You can work on one BOM all year, or a different BOM each month - the choice is up to you. As long as you do SOME work on your BOM every month, then it's all good!


Check-in Dates

1st January 2017: Check-in and tell us what your BOM for January will be. Add  photos of what the finished BOM will look like, and share pics of what you have done to date.

All through the month: Feel free to tell us how you are going.

Last week of January: Photos of your BOM please!

1st February 2017: Check-in and tell us what your BOM for February will be. Remember, you can work on one BOM all year, or a different BOM each month - the choice is up to you.

And so on through the rest of the year.

Bloggers

I'd like to also add links here to other Aussie bloggers who are in BOMs Away. So I have also turned this post into a BOMs Away page on this blog. If you comment there with your name, blog addy and your location, and I'll add you to the page.

And here's a handy dandy logo thingy to add to your blog if you'd like to help spread the word.


Saturday, 12 November 2016

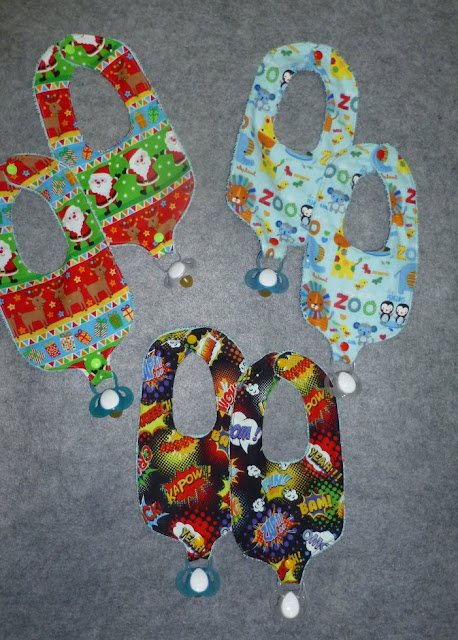
6 Binky Bibs FINISHED!

What the heck is a binky bib I hear you ask...

Well, it's a baby bib with a handy dandy clip to attach a dummy or teething ring. No more dummies falling on the floor when they're spat out!

I found a free pattern and tutorial at Aunty Em's Crafts. Talk about simple and fun to do! These took hardly any time to complete.

I bought some Christmas fabric, Superhero fabric and flannelette for the bibs. I wanted to back them with towelling cos dribble happens - a lot these days (bubs are almost 5 months old now).  Towelling by the metre was crazy expensive with a very limited colour range, so I bought a cheap bath towel instead and it worked out brilliantly.

Here they are...


The snaps were a breeze to attach too. Here's where I bought my snap machine and snaps from: Snaps Australia 

Can't wait to see my daughter's face when she sees them tomorrow. I don't think she's heard of a binky bib before!!

And here is Adam modelling the binky bib!! :D


ABC Cot Quilt #2 FINISHED!

Well, I've had a rather productive weekend.

I have just finished my second ABC Cot Quilt for my twin grandsons. The first cot quilt was finished a month or more ago, but I had trouble  getting started on the second one (I don't particularly like doing the same thing twice).

It's just a simple panel with a couple of borders added.


I used polar fleece for the backing as I wanted it snuggly but not too heavy. I did some simple quilting - in the ditch around the borders, diamond cross hatch over the panel, and a simple cable in the blue border. You can't see it too well in the photo tho....


Friday, 11 November 2016

Simply Sixteen !

Oh. My. Goodness.

My darling hubby has said that I can buy a HQ Simply Sixteen long arm quilting machine.

Whenever I want! This weekend if I like! How totally amazing is that?

Now I just have to do my research and find out which shops in W.A. will give me the best deal, and then I'll be able to start quilting. I've taken one for a test drive and it is SO much fun to play with.

*hoppity skippity happy dance*


Wednesday, 9 November 2016

Quilt Top Finished!

Today's effort... I finished my quilt top for the Handmade/Lucky Sew Along that I am doing with 15 other ladies.

I am quite proud of this one as we only started this on the 19th October - just over 3 weeks ago. I think that's a record for me!

Now I just have to work out how to quilt it. (quilting is totally NOT my favourite thing!)


Easy Peasy Design Wall

I need a proper design wall, but I haven't really got a spare wall for it, so I decided to try to make a lightweight, super easy, super cheap one that folds away to nothing. No tools needed and done in 5-10 minutes.

AND IT WORKED!!! Here's how....

Here's what you need
  • 4 metres x 901cm wide light grey felt on sale $27.96
  • Balsa wood 6.5mm x 75mm x 915mm $4.89
  • Double sided tape 16mm x 16m $4.99
  • Command Clear hanging strips - mini hooks $6.69
Total Cost for 2 design walls 90cm x 1.8m: $44.53

Now to make your walls

1. Cut felt into 2 pieces - it's sold as 90cm wide but was actually 96cm (which is handy cos I used the excess to make  no sew side hems).
2. Cut balsa wood lengthways into 2 pieces - one for each design wall.
3. Put two rows of double sided tape onto one side of the balsa.


4. Peel off the paper and stick the balsa to the top of the felt, then put two rows of tape on the other side of the balsa and peel off the paper. Turn the balsa over so that it neatly sticks to the felt. Your balsa is now enclosed in felt. :)


5. You'll note that the balsa is shorter than the felt. We're  going to use the excess felt to make neat side hems, which actually makes it hang nicer. But first we need to neaten the top edge. Cut the felt level with the edge of the balsa like so...


6. Now apply more double sided tape to the very edge of the felt, peel off the paper cover and fold the felt over to make a neat side hem.


7. Do the same to the other side, and also to the bottom edge so that we have neat hems all around.

Your design wall is now actually finished!!! How easy was that?

I don't want my design wall up all of the time, which is why I've made these ones which I can simply roll up and put on the shelf.

Hanging your design wall

I found 4 x 1" wide bulldog clips which I had kicking about in the "bits" drawer, and clipped one to each end of the balsa.

Then I used these nifty clear hooks and stuck them on my wall, matching up with the clips on the balsa wood.

Then I hung up my newly made design wall and voila! All done!


Of course, a 90 cm wide design wall is not all that useful, but 2 walls makes 1.8 metres, which is very handy indeed, so I made a second one and made sure I placed the hooks so that they butted up close together. You can hardly see the hooks on the wall at all.


And then it was time to put my design walls away. Simply unhook them, roll them up and put them in the cupboard, on a shelf or wherever.


I am feeling rather pleased with my project and can't believe how quickly and simply it came together. ! :)


Sunday, 6 November 2016

Handmade / Lucky

And here is what I am working on now.

I've joined a Sew Along group on Facebook, run by Alix Zeppel from Alize Fabrics. We're all using the Thimble Blossoms "Lucky" pattern and a "Handmade" by Moda layer cake. The background fabric choice is up to us.


Each week Alix makes a step by step video for us to follow, and we check in with our progress.

I am LOVING this as it is making me keep to a deadline. Otherwise I'd just start it and then get diverted by some other pretty thing, as usual.

We're up to week 3 now. I've just started putting some blocks together. I've not got a design wall yet, so I threw a flannelette sheet over the door and used that. Works a treat too! Here's the first 3 blocks.


Uh oh.... one of these things is not like the others! The black quarter is upside down. Doh! And I don't think I'd have picked my mistake up so soon without the design wall. I am SO going to make a proper one. Love it!


The Wall of Shame :)

Here it is... the wall of shame! :D


Actually, it's my much loved cube unit. Each box holds at least one kitted out patchwork project (except for the few small boxes in the middle - they're just some spare fat quarters. )

I forgot to mention in my previous post that I don't actually have much of a fabric stash - I just have kits and a few leftover bits.

Why am I a Guilty Quilter?

Why am I a guilty quilter? 

Well, it all started when I decided to tidy my sewing room. One thing led to another and it ended up being a complete patch, paint and redecorate. :)

I arranged all my "to do" patchwork projects neatly in boxes. It was going to be one project per box, but I had too many!!!!  And then the full catastrophe emerged.  In all there's 52 kits, BOMs and patterns that I have kitted out myself all ready to go.  There may even be a few more lurking that I've not found yet!

52 ! Make that 53. I found another one. :) Umm.. 54, 55, 56, 66

Hanging my head in shame...

I worked out that if I completed 4 projects per year it would take me until I am 81 to finish them all. 

I love putting patterns and fabrics together, but I am woefully bad at sewing them.  Maybe I am more a collector than a quilter?

So I have created this blog in the hopes that it might inspire me (or guilt me) into finally getting some things done. 

There's a link to my  UFO List of Doom in the sidebar on the right. I'll try to update it as and when something happens. :)

Wish me luck!!!!